Delcam adds automatic collision avoidance to PowerINSPECT
Estimated reading time 4 minutes
Delcam adds automatic collision avoidance to PowerINSPECT inspection software
Delcam has released the 2015 version of its PowerINSPECT inspection system, the world’s leading hardware-independent metrology software. The new version includes automatic collision avoidance, faster import of large CAD files, quicker preparation of longer inspection reports, and improved display of results from point-cloud data, plus many other customer-requested enhancements.
For full details, including video demonstrations of the new options, please go to www.delcam.tv/pi2015/lz/en/index.asp
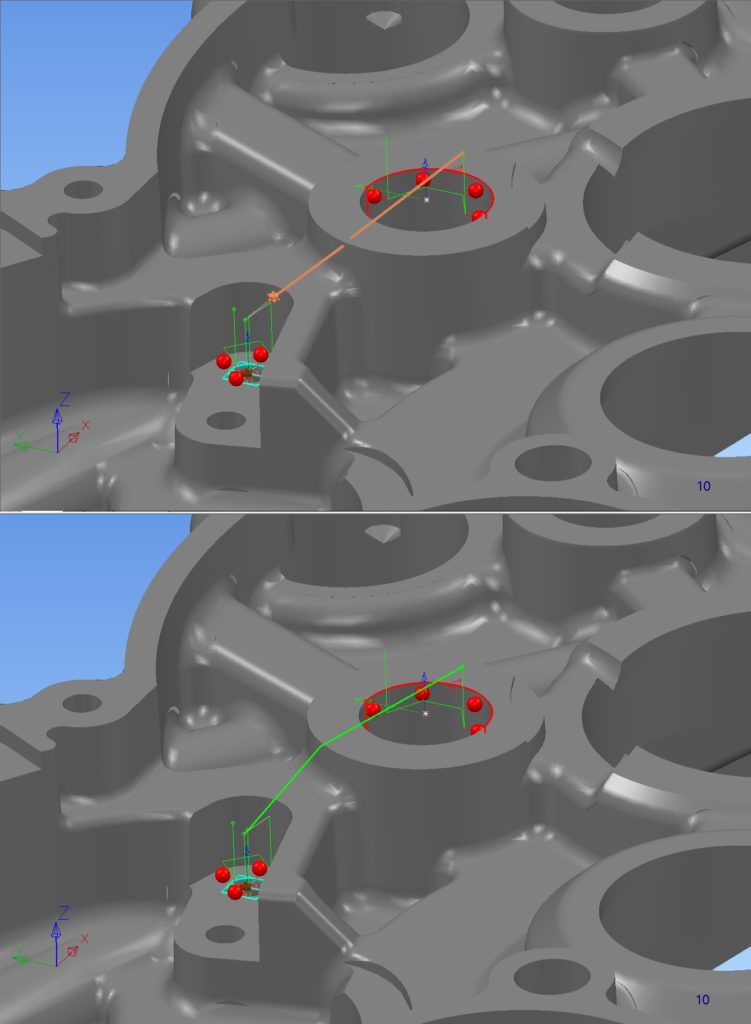
PowerINSPECT has included collision detection for many years to warn the user when there was a possibility of any collision between the probe and the item being inspected. Until now, the user then had to make the required changes to the probe path to avoid the collision.
With PowerINSPECT 2015, the software adjusts the probe path automatically if a direct move between inspection features could produce a collision. The software will calculate a new motion path that avoids the obstacle, typically by moving up and over the obstruction or around it.
Collision avoidance is carried out when the initial probe path is generated, when the sequence of measurements is re-ordered, and when features are added or removed. As well as preventing collisions, automatic collision checking will save significant programming time, especially when inspecting more complex items.
The user still has the option to override the path produced by the software. This might be required if any accessories not modelled in the CAD data are present, for example, any clamps or fixtures being used to hold the part.
A number of improvements to PowerINSPECT 2015 have made both data import and report generation much faster. The differences will be particularly apparent when reading large CAD models, such as a complete car body, and when producing longer reports with more graphical images.
Another improvement in reporting gives users much greater control over the contents of any report. For example, it is easier to produce a summary of the complete set of results as a management report. Similarly, a more concise report can be produced when greater detail is not needed, for example, when all the results are well within the expected tolerances.
The 2015 release also offers improved display of results from point-cloud data, including a better shaded display of the ‘colour map’, complete with the coloured scale of the tolerances. As well as making the results simpler to understand, the new format is more consistent with the reports produced by PowerINSPECT from data from other types of measurements. This makes it easier to compare the results from different devices or measurement methods.
A number of other usability enhancements have been included. The representation of changes to the probe or to the probing parameters is now clearer and easier to understand. These improvements will be especially useful when creating longer inspection sequences for CNC coordinate-measuring machines and for on-machine verification. They will also make it easier for CMM operators to follow measurement sequences developed by another user, for example, when the inspection routine is created by the company’s metrology expert but then carried out by less experienced users.
Another usability enhancement is the addition of scale-model inspection. In this mode, the measurements from a scale model, such as a half-scale car, are displayed as though they were the results from the full-size item. This makes the reports easier to understand at first view and makes it quicker to exchange digital measurements with the CAD system as there is no need to compensate for the scaling in the model.
It has also been made easier to handle more complex CAD data structures, with data split over a series of levels. In particular, it is easier to match the CAD view to an item contained within a history tree.
Finally, a new intersection item has been added to the range of geometry that can be measured with PowerINSPECT; the intersection between a sphere and either a cone or a cylinder. This option will be useful when measuring ducting and pipework.
For further information on Delcam’s PowerINSPECT software, please contact:-
Peter Dickin, Marketing Manager
Direct phone: 44 (0)121 683 1081 e-mail: marketing@delcam.com
Delcam Ltd
Small Heath Business Park,
Birmingham, B10 0HJ, UK
Caption: Previous versions of PowerINSPECT would simply highlight collisions (top) but the 2015 release avoids the collision automatically (bottom)


