Delcam’s new PowerINSPECT makes complex inspections faster and easier
Estimated reading time 4 minutes
The 2015 R2 release of Delcam’s PowerINSPECT inspection software makes it easier to complete fast and accurate inspection of complex assemblies. The new version includes more options for automation of inspection sequences, including automated probe changes, automatic feature extraction for point cloud batch inspection, and greater control over collision checking.
For full details, including video demonstrations of the new options, please go to www.delcam.tv/pi2015/lz/en/
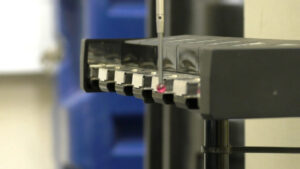
 The main improvement for users of CNC CMMs is the addition of support for MCR20 and FCR25 probe change racks. PowerINSPECT can now incorporate probe changes into fully-automated measurement sequences. Enhancements to the probe database allow the user to define probe tools in terms of ‘sub-assemblies’ which can be docked in the rack ports. A typical example of a sub-assembly is the combination of a probe module and a stylus.
Once created, the sub-assemblies are allocated to specific ports in the probe change rack, and the user defines the physical location of the rack on the CMM by measurement. PowerINSPECT carries out probe changes as required by the measurement sequence and keeps track of the sub-assemblies as they move between the probe head and probe rack.
A new ‘zoom-to-fit’ option is available that shows, in the CAD view, groups or individual items that have been selected in the sequence tree. This option will save considerable time, especially when locating specific features in large, complex CAD models or long measurement sequences.
It is also easier to navigate between the graphical display of the CAD model and the CAD file manager history tree. Selecting a CAD level or individual surface in the graphical CAD display highlights the corresponding item in the CAD file manager history tree. Similarly, selecting an item in the history tree highlights the corresponding surfaces in the graphical CAD display.
PowerINSPECT 2015 R2 includes a new way of evaluating features from point-cloud data that makes batch inspection much easier. Geometric point-cloud features can now be evaluated from suitable scan data that exists anywhere in the PowerINSPECT document. The features are created in the usual way, either from the geometric toolbar or by using the wireframe checker. The entire sequence can be created in advance and then PowerINSPECT will evaluate the results automatically as soon as the scan data is available. Operators measuring subsequent, similar parts just have to perform the scan and the sequence of features is evaluated automatically. Once the scan is complete, all specified features are calculated and the report is updated automatically.
With PowerINSPECT 2015 R2, users have better control over RPS alignments thanks to a new option to define which features are used for any best fit calculations, rather than calculating the best fit across all of the features selected for the alignment. It is also now possible to apply an offset to an RPS alignment, if required.
Improvements to the graphical display have made programming of CNC edge points much easier and more intuitive. When creating edge points, PowerINSPECT displays a live preview of the edge point based on the current cursor position. When editing edge points, the point pairs and probe paths update simultaneously as the point is dragged along the edge.
Finally, a new option has been added to measure waviness or small fluctuations in surface smoothness that can result from cutting tool wear or worn machine components causing vibrations during machining. Waviness defines the allowable variation within a localised region. This allows simultaneous control of very tight tolerances inside small localised regions and looser tolerances over larger areas. For surface inspection and point cloud inspection PowerINSPECT can now produce a waviness evaluation based on the differences between a point and its neighbours. Each point passes the waviness test if its variation relative to neighbours in the specified zone is within the tolerance limit. An overall value for the part is expressed as a ratio of the number of points passing the test to the total number of points measured.
For further information on Delcam’s PowerINSPECT software, please contact:-
Peter Dickin, Marketing Manager
Direct phone: 44 (0)121 683 1081
e-mail: marketing@delcam.com
Delcam Ltd
Small Heath Business Park,
Birmingham, B10 0HJ, UK
www.delcam.com


